


13 Macrame Beginner Mistakes: How to Fix Them
We've all had this moment. You finish your first macrame wall hanging, hold it up against the wall, and something inside you sinks a little. It doesn't look like the photo. The fringe sits frizzy where it should be soft. The macrame knots you spent an hour tying look slightly crooked. You can't name what went wrong, but you can feel it.
If that's where you are right now, this macrame troubleshooting guide is something worth knowing early. It's almost never about your skill. The gap between your project and the one you copied is almost always a small set of fixable things. Cord choice. Tension. Project setup. Not talent. Just information you didn't have yet. This guide to macrame for beginners covers the 13 most common macrame mistakes to avoid, and how to fix each one.
Whether you're just figuring out how to start macrame, or already three projects in and wondering why your knots look off, the same patterns keep showing up. Find the ones that match what you're stuck on. Skip the rest. We've been manufacturing macrame cord in Jaipur since 1990 as Saras Creations, so most of these mistakes are ones we've watched 500,000+ crafters work through.
Quick Answer: Five Mistakes Behind Most Beginner Frustration
Wrong cord type for the look you want (soft cord on a structured pattern, or stiff cord on a fringe project)
Inconsistent tension from working flat on a table instead of hanging the dowel vertically
Cord cut too short because lark's head knots double the cord you need
Spiraling square knots when you wanted flat, because you didn't alternate sides
A "beginner" project that's secretly intermediate, then blaming yourself when it goes badly
If you only fix these five, your next project will look noticeably better.
Most beginner macrame problems come down to three things: choosing the wrong cord, inconsistent knot tension, and incorrect measurements. Fix those first and your projects will improve dramatically.
Mistake 1: Buying cord based on price instead of project
You see the listing: "premium macrame cotton cord, 100m, 40% off." You may choose to buy, but the cord feels stiff, the fibres smell faintly chemical, and when you try to brush out the fringe, you get a frizzy explosion of half-broken fibres. You assume you're bad at macrame.
You're not. The cord is a recycled cotton blend, often cut with polyester to bulk it up, and it was never going to fringe properly, no matter how skilled you got.
The fix: Buy from a craft-specific manufacturer, not a generic marketplace listing. Look for three things in the listing. First, "100% cotton" or "virgin cotton". Second, the construction style spelled out: single-strand cord, 3-ply twisted, or braided cotton cords. Third, at least one product photo showing brushed-out fringe. If every photo only shows tied knots, the seller knows the cord can't fringe.
Expect to spend around 1.5 to 2x what the cheapest bulk listing costs. The difference is small in rupees or dollars. It's enormous in how the finished piece looks.
What cord to use for macrame
Macrame cord falls into three broad categories. Single-strand cord (sometimes called single-twist) brushes out into soft fringe. 3-ply twisted cord holds structured knots while still being workable. Braided cord is the strongest but locks knots tight, which makes mistakes harder to undo. Cotton is the standard macrame cord for beginners. Jute cords, wax cord, and PP cord each have specific uses.
Here's the practical way to pair cord with project. Start from the look you want, then pick the cord that produces it:
| Finished look | Use this cord | Why |
| Soft fringe on a wall hanging | Single-strand cotton cord, 4-5mm | Brushes into wispy tassels |
| Crisp structured square knots | 3-ply twisted cotton cord, 4-5mm | Holds shape without going floppy |
| Plant hanger holding a heavy pot | Braided cotton cord, 4-6mm | Strongest, no stretch, secure knots |
| Jewelry, friendship bracelets, keychains | Wax cord or 1-2mm micro macrame cord | Holds tight knots, smooth finish |
| Large statement wall art | 5-7mm single-twist or 3-ply | Grabs Attention |
| Outdoor planter | PP knot cord, 4-5mm or jute cord | Doesn't mildew or rot when wet |
The real mistake isn't picking the wrong cord on its own. It's picking the cord first, then trying to bend a project around it. Always start from the photo of the thing you want to make. Work backward to the cord, the thickness, and the fibre. Need help? Read our full macrame cord thickness guide from 1mm to 8mm.
💡 Beginner Tip
Start with a 4mm or 5mm 3-ply twisted cotton cord. It offers clear knot definition and is easy to work with while learning.
Mistake 2: Working flat on a table when you should be hanging vertical
Start with a 4mm or 5mm 3-ply twisted cotton cord. It offers clear knot definition and is easy to work with while learning.

Most beginner tutorials show macrame being tied flat on a table. It looks tidy in the photos. In practice, it fights you the whole way.
Flat work uses pure hand strength for tension on every knot. Your shoulders tense up, your forearms tire in twenty minutes, and the cords drift sideways because nothing's pulling them down. By row 30, your tension is all over the place because your hands are exhausted.
The fix: Hang the dowel at chest height. A clothes rack works. So does a sturdy hook in the wall or the top of a closet door. Gravity does half the tension work, your eyeline meets the knots directly, and you catch tension problems the moment they happen instead of three rows later.
Mistake 3: Inconsistent tension you can't see until row 10

Tension is the word every beginner hears. "Pull each knot the same" is the standard advice. Of all the macrame tension problems beginners run into, the trickiest one is why tension drifts even when you're trying to keep it consistent.
A square knot has two halves, tied with two working cords (the outer cords that do the tying) around two filler cords (the inner cords that stay still). Most beginners pull the first half tight, then the second half a touch tighter, then the next first half tighter still. Tension creeps up across a sennit (a column of stacked knots) without you noticing. Row 1 is loose. Row 20 is so tight the cord visibly bunches.
You don't notice while it's happening because each knot feels normal in your hands. You only notice when you step back and the whole panel is hourglass-shaped instead of rectangular.
The fix: Pick a tension target on your very first knot and physically remember it. Some people count seconds (a slow 1-2 count on each pull). Others tie the first three knots deliberately loose, until "loose" becomes their baseline. Having one consistent target matters more than which target you pick.
Also: stop tying when you're tired. Hands shift unconsciously when fatigued. Twenty good knots beat fifty inconsistent ones.
⚠️ Common Mistake
Many beginners underestimate how much cord gets consumed by knots. When calculating lengths, always allow extra cord for safety.
Mistake 4: Cutting cord without doubling for lark's head
Many beginners underestimate how much cord gets consumed by knots. When calculating lengths, always allow extra cord for safety.
This is the math mistake every beginner makes exactly once and never forgets.
The standard rule says cut your cord at 4 to 6 times the finished length. You're making a 50cm wall hanging, so you cut at 200cm. Reasonable. Then you fold each cord in half over the dowel using a lark's head knot (some patterns call it a cow hitch). Suddenly every cord hangs at 100cm. Your project ends at knot eight.
The fix: Whatever working length you need, double it before cutting. Need 200cm of working cord per strand? Cut at 400cm. The same doubling applies whether you're mounting on a dowel, a wooden ring, a metal ring, or a piece of driftwood.
Write the formula on a post-it and tape it next to your scissors: working length × 2 = cut length. After three projects the math will be automatic.
How much cord for macrame: a more honest calculation
The "4 to 6 times" rule of thumb is rough. Here's a better version, calibrated to how dense your pattern is:
Open patterns (lots of negative space, mostly half hitches and double half hitches): Cut at 4X finished length, then double for lark's head
Standard density (mixed knots, moderate spacing): Cut at 5X, then double
Dense patterns (stacked square knots, alternating square knots, tight grids): Cut at 6X, then double
If you tie loose: Add 15% on top of the formula
For fringe: Add the fringe length to the working length, then double the whole thing
For a gathering knot (the wrapping knot that finishes most plant hangers): Add an extra 30cm to whichever cord becomes the wrap
Running out of cord at row 25 of a 30-row hanging is the most demoralising thing in this craft. Cutting an extra meter wastes almost nothing. The trade-off isn't close.
Mistake 5: Picking a "beginner" project that's actually intermediate
A lot of projects labeled "beginner" on Pinterest aren't really beginner-friendly. The simple-looking final photo hides decreasing rows, diagonal patterns, or colour blocking that takes real skill to execute cleanly. There's a real difference between easy beginner macrame projects and intermediate ones disguised as easy.
The honest beginner progression looks like this:
Practice swatches on scrap cord, just rows of square knots and half hitches (30-60 minutes)
Keychain or small plant hanger ring on a wooden ring (1 hour)
Small wall hanging with simple fringe (2-3 hours)
Real plant hanger with longer cords and a pot to hold (3-4 hours)
Patterned wall hangings with diamonds, diagonals, or colour blocks (half a day or more)
If your first project is from step 5, the issue isn't your skill. It's the project. Back up two steps and build the muscle memory before you attempt the design you actually want.
This one's tricky because it doesn't feel like a mistake. It feels like ambition. But starting too hard is one of the fastest ways to lose momentum with the craft.
Mistake 6: Macrame square knot vs spiral confusion
You meant to tie a flat panel of square knots. You ended up with a twisted spiral that wraps around itself.
This isn't a tension problem or a tutorial problem. Tying from the same side every time creates a spiral, not a square pattern. A real square knot alternates: left-over-right one row, right-over-left the next. Same side every time gives you the spiral knot (also called the half square knot or twisted sennit), which is a separate and lovely knot when you actually want it.
The fix: Say it out loud as you tie. "Left over right, right over left, left over right, right over left." Sounds silly. But it works. After 20 knots you won't need to say it anymore.
If you've already tied half a panel as a spiral and wanted flat, don't undo it. Frame it. Spiral sennits look intentional, and undoing them often creates more problems than it solves.
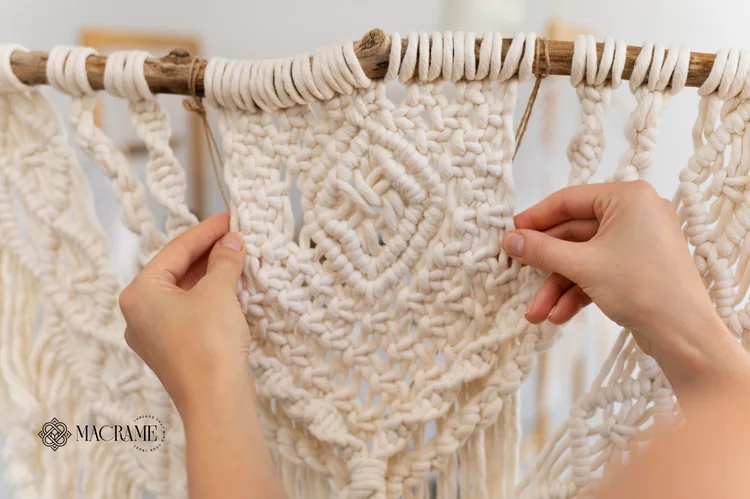
Mistake 7: Ignoring horizontal alignment and knot spacing
You've kept your tension steady (Mistake 3), so your panel doesn't bunch vertically. But step back and look at it sideways: the right edge sits lower than the left. Or your alternating square knots in row 3 don't line up with the ones in row 5. Something is off and you can't quite name it.
This is alignment, and it's a separate problem from tension. Tension keeps your knots from bunching down a column. Alignment keeps your knots in straight rows across the panel. Most beginners think of them as the same thing, so they don't fix what's actually broken.
The fix: Use a ruler or measuring tape to mark spacing intervals on your dowel before you start. For alternating patterns, mark where each knot should sit. A strip of masking tape with pencil marks works fine. Some makers tape a paper grid behind their work as a visual guide.
For the row-by-row check, step back every few rows and look at the piece from across the room. Alignment problems jump out from a distance that you can't see while you're working up close. Catch them within two rows and you can adjust. Catch them at row 15 and you're untying half the project.
Mistake 8: Not securing your dowel before you start
The dowel needs to be stable. Really stable. Not "kind of resting on a doorframe" stable. The same rule holds whether you're using a wooden dowel, a piece of driftwood, a copper pipe, or a metal ring, and it needs to be anchored at both ends.
If the mount rocks even slightly, every knot lands at a different tension because the dowel absorbs part of your pull. Your knots look inconsistent and you blame your knotting when the real issue is the setup.
The fix: Two screw hooks in a wall, S-hooks on each side of a clothing rack, or two strong push pins into a cork board. The dowel should not move when you pull a cord hard. If it does, you'll feel it in every knot.
For small projects like keychains or bracelets, a clipboard works well, holding the starter knot tight at the top while you tie below.
🧶 Quick Fact
Even experienced macrame artists regularly stop to measure spacing and adjust symmetry throughout a project.
Mistake 9: Trying to fix mistakes by cutting instead of untying
Even experienced macrame artists regularly stop to measure spacing and adjust symmetry throughout a project.
You spot a wrong knot five rows back. The temptation is to cut the bad section out and splice in new cord. Don't. Cutting introduces a join that will always be visible, and the join is more obvious than the original mistake would have been.
Single-strand cord and 3-ply cotton cord both untie cleanly if you go slowly. Braided cotton cord is harder, almost impossible if the knot has been tight for hours. So address mistakes now, before the cord remembers the wrong shape.
The trick that helps most: Use a tapestry needle, knitting needle, or a thick darning pin to loosen tight knots. Slide it in to create space, then unwork the knot one loop at a time. Far better than fingers alone.
And if a knot truly won't come undone, accept the imperfection and keep going. Nobody will notice the mistake you obsess over.
Mistake 10: Combing fringe with the wrong tool

Once you've finished knotting and you're brushing out the fringe at the bottom, the wrong tool will undo all your careful work in two minutes. Metal pet combs with fine teeth grab single-strand cotton fibres and tear them. Once torn, the fibres go frizzy in a way that won't lie flat no matter what you do.
The fix: Use a wide-tooth wooden comb, a slicker brush meant for soft yarn, or just your fingers for delicate cord. Comb in short downward sections rather than long aggressive strokes. The cord tells you when it's done. Each strand should lie flat and look slightly shiny.
One more thing: comb fringe after the piece is hung on the wall, not before. Combed fringe gets messy the moment you handle it. Save the combing for last.
Mistake 11: Storing cord (and finished pieces) the wrong way

Macrame cord stored in a tight ball develops permanent kinks. Cord in a plastic bag during humid weather (anyone working through monsoon in coastal India, or summer in Florida) can mildew or pick up a damp smell that never fully comes out. Cord in direct sun fades unevenly, so your second project from the same spool won't quite match the first.
Finished pieces have their own problems. A wall hanging stored folded for months develops creases that won't steam out. A plant hanger crammed into a drawer comes out tangled.
For unused cord: Loosely coiled on its original spool, in a breathable cloth bag, out of direct sun.
For finished pieces: Hang them, even in storage. A spare hook on the inside of a closet door beats any folded option.
Mistake 12: Following video tutorials when written patterns help more
Video is the right format for learning a new macrame knot. You need to see the hand motion, and photos can't quite capture it. But for following a full project, written patterns are faster.
You can re-check a step without scrubbing through a 30-minute video. You can see the whole structure at a glance. You can leave the project and come back without losing your place. Most beginners stay on video long after they should have switched, and a 22-minute tutorial ends up taking them 90 minutes because they keep pausing, rewinding, and missing the step they were trying to copy.
The fix: Once you know your three foundation knots (lark's head, square knot, double half hitch), switch to written patterns or PDFs for full projects. Use video only for new knot types or unusual techniques. Your project speed will roughly double.
Mistake 13: Quitting after one bad project
Your first macrame wall hanging will look worse than the photo. Probably significantly worse. The gap isn't a sign of permanent inability. It's a sign you've done this exactly once.
The third project is when macrame starts to feel good. The first teaches you what cord does. The second teaches you what tension does. The third is when your hands stop fighting the knots and start cooperating with them.
If your first project comes out badly, that's data, not failure. Note the one thing that went wrong, and fix that one thing next time. Don't try to fix everything at once. The polished pieces you see online are years of practice compressed into a single photo.
Frequently Asked Questions
- What is the biggest macrame mistake beginners make?
- Cutting cord too short. Almost everyone does this once by following the "4 times finished length" rule without doubling for lark's head attachment. Cut every cord at 4 to 6 times your finished length, then double if you're folding cords over a dowel.
- Why are my macrame knots uneven?
Inconsistent tension, not bad knotting. Work at eye level with the dowel hung vertically so gravity helps you. Pull each side of every knot with the same force. Slow down for the first 20 knots until your hands settle into a rhythm.
- What cord should a complete beginner buy first?
4 mm or 5 mm single-strand cord 100% cotton, around 50 meters. It shows knots clearly, untangles easily, and works for most starter projects. Skip recycled blends and anything under 3 mm until your tension is steady.
- How long should my first macrame project take?
A keychain takes about 20 minutes. A small wall hanging takes 2 to 4 hours your first time. Plan for roughly double the video runtime on your first attempt. Speed comes with practice.
- Why is my macrame curling or twisting at the bottom?
You're tying square knots from the same side every time, which makes a spiral. Alternate the starting side each row to get a flat panel. The spiral knot is a feature when you want it, a bug when you don't.
- What are the basic macrame knots every beginner should learn first?
Three knots cover most beginner projects: the lark's head knot to mount cords on a dowel, the square knot for flat panels, and the double half hitch for diagonal lines. Add the spiral knot (half square knot) once you've got those down.
How to Macrame: Your Next Step
The best macrame tips for beginners come down to one thing: make a practice swatch before anything else. Cut four short cords, tie them to a pencil, and do twenty square knots and twenty half hitches. No final piece, just the motion. Your first real project will feel different afterward, because you'll have removed the variables that wreck most first attempts.
When you're ready to start, browse our full range of macrame cords or read our cord thickness guide from 1mm to 8mm for going deeper on materials.
Ready to start fresh? Pick up our 4mm 3-ply cotton cord, the easiest cord to learn on. Use code FIRST10 at checkout for 10% off your first order. Free shipping across India.
Last updated: June 2026
Written by the Macrame.co.in team, Saras Creations. We have been manufacturing macrame cord in Jaipur since 1990. Trusted by 500,000+ crafters across India and globally
Join 500,000+ Crafters - Get 10% OFF Your First Order
Subscribe for new arrivals, DIY tutorials, and exclusive discounts.